This Door Seal Design Guide from Elasto Proxy provides engineers with an overview of six factors to consider when designing door gaskets for any industry. Whether you need seals for mobile equipment, ovens, tablet coating presses, gensets, or electronic enclosures, you’ll find what you need to get started.
As you consider these six factors, we invite you to contact us to discuss your specific application.
#1 Material Selection
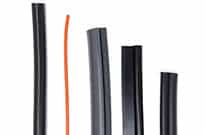
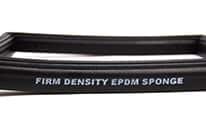
Most door seals are made of medium-density sponge rubber. The compound, or type of rubber, must be able to withstand the environment to ensure reliable, long-term sealing. At Elasto Proxy, we use an acronym called MTAP to describe the four factors you need to consider:
- Media (M) refers to contact with water, fuels, chemicals, cleaners, and other substances.
- Temperature (T) refers to both the temperature range and the service temperature.
- Application (A) describes the flanges, fasteners, hinges, and other features of the door.
- Pressure (P) is the amount and duration of pressure on the seal when the door is closed.
For mobile equipment doors, EPDM and TPE are commonly used compounds. Both are weather-resistant, but EPDM costs less while TPE is recyclable and supports tighter tolerances. Oven doors use silicone seals while the door gaskets on tableting presses uses fluorosilicone instead. These are just a few examples.
Because most door seal design specifies a medium-density rubber, the durometer isn’t as hard as a hockey puck or as soft as a pencil eraser. Instead, the durometer is somewhere in-between to support compression without compression set, the failure of a seal to “bounce back” when the door is opened.
The sponge rubber in a door gasket has a cellular structure with open cells that allow the passage of air and water, or closed cells that do not. Gaskets with flame resistance or EMI shielding are sometimes required, too. As we will see, the shape and dimensions of a door gasket also affect performance.
Before we move on, here are some questions for you to ask and answer:
- What is the media (M)?
- What is the temperature (T)?
- What is the application (A)?
- What is the pressure (P)?
- Which compound do you need?
- Which durometer do you need?
- With sponge rubber, do you need open or closed cells?
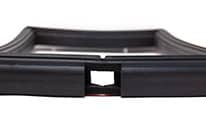
#2 Gap Size
Door gaskets need a bulb that’s large enough to fill the gap between the door and the frame. This bulb must then compress enough for the door to close and seal. The gap size can vary between a door’s four corners or edges, so you’ll need to take a few measurements and complete this calculation.
Average Gap Size + Compression Percentage = Bulb Size
First, calculate the average gap size. An easy way to do this is to place some modeling clay in each corner and then close the door. Next, insert calipers into the clay and record the measurement for each of the four corners. Add these numbers together and divide by four get the average.
Next, apply a compression percentage between 25% and 50%. This is the amount you want the door seal to compress. Do not apply more than 50% because over-compressing the bulb won’t create a better seal and may cause compression set. If you need a more compressible rubber, use a softer material instead.
In summary, here are some key questions to ask and answer.
- What is the average gap size?
- What is the compression percentage?
- Based on this information, what is the bulb size that you need?
#3 Hinges
The position and design of the hinges also affects door seal design. Gaskets compress more on the hinge side because there’s greater pressure. For best results, design the hinge plates so that they are more forgiving and won’t place excessive pressure on the seal. This may require a hinge plate redesign.
Symptoms of improperly designed hinge plates include a flattening of the door gasket on the hinge side and a gap on the latch side. The solution may require moving the door panel outward on the hinge side to support proper compression. The goal is to achieve uniform compression along the entire frame.
The design and position of the locking system and the suspension of the door itself are also potential sources of seal failure. Locks and hinges that are misaligned, manufacturing defects, or assembly errors can all create zones with inadequate sealing force that may result in leaking.
For hinges, here are some questions to ask and answer:
- Do your current hinge plates put too much pressure on the seal?
- What is the position of the hinges and the locking system?
- Do your current seals have zones with uneven or inadequate compressive force?
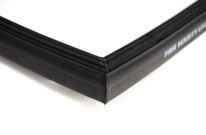
#4 Corners
Door seal designers also need to consider the type of corners (if any) that are needed. Some seals have corners with a 90° splice or joint. These gaskets are visually appealing but require four individual splices, which adds costs. That’s why some engineers specify an endless gasket with a single butt-splice instead.
Rounded or radiused gaskets require fewer splices but raise additional concerns. As a rule, a smaller bend radius requires a smaller seal. If you use a small radius with a large seal, kinking may happen and cause the seal to leak. When the radius on a door gasket is too tight, the seal’s corners tend to “pop” out.
A more flexible gasket material can support a smaller bend radius, but you’ll need to balance this against all of the other factors in material selection. If you’re unsure which bend radius you need, determine the minimum distance from the center point to the edge where the seal must bend.
Finally, remember that bulb trim seals – a common choice in door seal design – need rounded corners. Molding is the only bonding technique that can create these corners and is also recommended for gaskets with square corners that will be stretched or pulled. For square corners, you can also use these methods:
- Hot splicing uses heat, pressure, and a thin PE film splice.
- Vulcanization uses heat, pressure, and uncured rubber.
- Cold bonding is a manual process that’s performed with a brush and an adhesive or glue.
When it comes to corners, here are some questions to ask and answer:
- Do you need 90° corners or rounded gaskets?
- For rounded gaskets, what is the minimum bend radius?
- Is your seal too large to support a small bend radius?
- Which bonding or splicing method do you need?
#5 Fastening
There are several ways to fasten or attach door gaskets. The use of an adhesive backing is popular because it supports peel-and-stick installation. Clean surfaces are required, however. At Elasto Proxy, we use a high bond adhesive tape system (HATS) or can apply a pressure-sensitive adhesive (PSA) tape.
Fastening can also be achieved by pushing the seal over a flange that holds the gasket in place. Channel sets can be used in place of clip-on seals. The gasket is like a Christmas tree that, once pushed into the channel, has inverted branches that are self-gripping and hold the gasket in place.
Gaskets with raised contact points make it harder for water to pass between the gasket and the door’s surface. For example, a D-shaped gasket with two small “ears” has a total of three contact points for enhanced sealing. Door gasket design can also support higher contact force if incoming pressure increases.
Here are some questions to ask and answer about fastening:
- Do you need taped gaskets?
- Will you just push the seal over the flange instead?
- Do you need channel sets, clip-on seals, or self-gripping gaskets?
- Would it help to have door gaskets with special features like “ears”?
#6 Installation
Finally, engineers need to consider the relationship between door gasket design and installation. If an installer starts in one corner and pulls the rubber toward another corner, you might hear complaints that the gasket is too big. But that’s not the case. Rubber is elastic and can be stretched too far.
The right way to install a door gasket is to use two corners and meet in the middle. With large surfaces, install each end of a gasket in the corners and then at a center point. Then finish the job by installing the gasket from the corners to the center point.
If you need to reposition a HATS-taped gasket, you might be able to do it once (or twice if you’re lucky) because the bonds are so strong. For best results, install these gaskets in a climate-controlled building instead of out in the field, where temperature and humidity may affect curing.
Sometimes during gasket installation, workers use the wrong tools (such as screwdrivers or wooden mallets) that can damage the rubber. With taped gaskets, a plastic roller can safely apply pressure across the seal’s face. PSA curing is instant, but HATS curing takes 24 hours under the right conditions.
Here are some questions to ask and answer about installation:
- Who will install the gaskets and what type of training will they receive?
- How will you monitor waste from improper installation and then take corrective action?
- Where will you install the gaskets so that you can optimize adhesion?
Door Seal Design and Finished Gaskets
Buying finished gaskets from an experienced fabricator like Elasto Proxy can save you time and money in the end. Our solutions providers can help you with material selection, gap size calculations, and with design considerations that include everything from hinges and corners to fastening and installation.
Pre-fabricated gaskets can also help you to stop wasted movement and promote physical distancing during COVID-19. You can also combine highly-efficient custom fabrication with value-added services like kitting and assembly packaging.
Are you ready to learn more? Contact Elasto Proxy.
Did you like this article? Elasto Proxy publishes a new one each week. Just tell us your email address and we’ll notify you whenever new content is available.