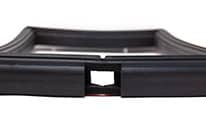
Edge trim protects exposed edges and the people who come into contact with them. In addition to sealing and insulation, edge trim provides a finished appearance to surfaces such as the metal doors on vehicles, machinery, and equipment. Choosing the right type of edge trim for your application is important, but you’ll also need to install these seals with care. Otherwise, edge trim can buckle or separate.
In this “How to” article from Elasto Proxy, you’ll learn how to select edge trim based on dimensions and material requirements. You’ll also learn some best practices for cutting trim seals, as edge trim is also known. You can buy lengths in bulk and cut them yourself, or you can buy edge trim that’s been cut-to-size for your application. Either way, you’ll need to install edge trim by pressing the seal onto the edge.
Edge Trim Dimensions
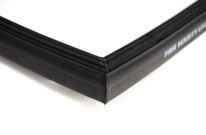
Choosing the right edge trim starts with measuring the thickness of the edge to cover. Make sure that the seal you select has the same thickness as the edge. In other words, don’t select a trim seal that’s too thick or too thin for the flange. For example, if you need to cover an edge that’s 0.125” (0.3175 cm) thick, specify a trim seal with an edge thickness of 0.125” (0.3175 cm)– not 0.120” (0.3048 cm) or 0.130” (0.3302 cm).
Leg length is another important measurement. As a rule, shallower flanges for rubber trim require shorter leg lengths. If the edge that you need to cover is curved, measure and record the bend radius. Then compare this measurement to the minimum bend radius for the edge trim you’re considering. If the edge trim buckles because it can’t accommodate the radius, the trim seal may not perform properly.
Edge Trim Materials
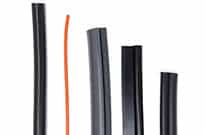
Materials of construction are also important to consider. Select a rubber or plastic that can withstand the application environment and that resists compression set. Rubber edge trim can be made of solid, sponge, or dual durometer rubber. Bulb trim, a type of edge trim, can have a softer (lower durometer) bulb and a harder (higher durometer) retainer that’s pressed into place over the flange.
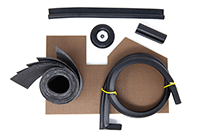
Elasto Proxy provides standard edge trim in these and other materials.
- EPDM edge trim remains flexible at low temperatures and resists moisture and ultraviolet (UV) light. Fire-rated EPDM that meets flame, smoke, and toxicity (FST) requirements is available.
- Neoprene edge trim provides more limited flexibility at low temperatures, but offers flame and water resistance.
- PVC edge trim is strong, lightweight, and abrasion-resistant. It’s easy-to-install, but may crack in the cold and fade in the sunlight.
- TPE edge trim is less likely to crack in the cold than PVC; however, TPE trim seals are more expensive.
- Silicone edge trim provides low toxicity, low chemical reactivity, and thermal stability over a wide temperature range. Dust and other particles may adhere to silicone rubber, however.
Most edge trim is black, but you can choose trim seals in colors such as silver or white to match your larger product designs. Edge trim can have a smooth or textured (pebbled) finish, too. For additional gripping, edge trim can have interior tongues.
To help absorb impact, edge trim may contain steel wire or segmented steel cores. Steel wires are spaced apart and run parallel to the length of the legs. Segmented steel cores consist of sections that cover more surface area beneath the rubber or plastic. Because of steel’s ability to withstand impact under colder temperatures, a steel core may be required for outdoor applications such the doors on mobile equipment.
Edge Trim Cutting
As explained in the introduction to this article, edge trim comes in lengths that you can cut yourself. You can also buy edge trim that’s been cut-to-size based on your specifications. Cutting lengths of rubber in-house may seem cost-effective, but using a hand tool like a wire cutter can crimp the ends and result in material waste from poor-quality cuts.
Custom-fabricated edge trim from Elasto Proxy features precise cuts and clean, smooth edges. The abrasive saw blade that we use won’t put pressure on the profile either. If you still decide to make the cuts yourself, make sure to use the right tool. Also, feel for the gap between the clips if the trim seal has a segmented core. If you don’t find the right spot before cutting, the edge trim may crush and deform.
Creating mitered corners can be especially challenging. Typically, these angled cuts are made at 45° angles into the face of the edge trim. When two complementary cuts are joined together, the mating lines need to be uniform. If you’re making the cuts yourself, use a 90° miter tool rather than tin snips. Cut a notch from each leg, but cut only one leg at a time.
Trim Seal Installation
Edge trim is pressed into place over the flange. For high volume installations, you may want to use a pneumatic air hammer instead of your hands. For best results, always install lengths of edge trim so that the ends won’t separate. Push the ends together and leave some material in the loop that’s created. Then push down on the edge trim to ensure a proper fit avoid stretching.
We hope you’ve enjoyed this article from Elasto Proxy and encourage you to contact us with your questions.