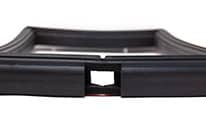
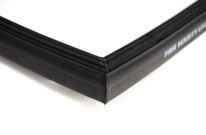
Locking gaskets are lengths of rubber that lock into place to provide a secure seal between stationary glass and a body panel. These rubber gaskets are used with the windows and windshields on mobile equipment such as trains, trucks, and buses. They’re also used with the viewing windows on enclosures for machines, instruments, and equipment. Additional applications include boat windows, clean rooms, and the windows used in high-traffic doors found in warehouses.
In this “How to” article from Elasto Proxy, you’ll learn how to install locking gaskets properly – and without risking breakage to windows or windshields. We’ll start with measurements and material selection, and also consider the advantages of buying rubber gaskets that are already cut-to-size. Most importantly, you’ll learn some installation tips and best practices that can save you time while helping to avoid damage to body panels.
Locking Gasket Measurements and Material Selection
Choosing the right locking gasket begins by taking some basic measurements. First, measure the thickness of the glass that the rubber seal needs to fit. Elasto Proxy supplies locking gaskets for standard thicknesses, but we can also supply custom profiles for specialty sizes. Next, measure the height and width of the glass. Add these numbers together and then multiply the sum by two. This gives you the overall length for the locking gasket that you’ll need.
Some engineers are more familiar with metal parts than with rubber profiles. That’s why it’s important to know that rubber can shrink and stretch significantly. Tight tolerances are possible with metal channels, but not with the rubber extrusions used in locking gaskets. When you define your seal design, the part tolerance needs to correspond to a class from the Rubber Manufacturers Association (RMA). Elasto Proxy can review your part drawings and help you to define seal tolerances in terms of RMA classes.
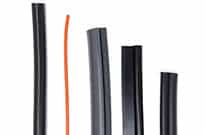
You’ll also need to specify the locking gasket material. With mobile equipment, EPDM is often used because this rubber remains flexible at low temperatures and resists both moisture and sunlight. For food processing and medical equipment applications, locking gaskets made of FDA-approved silicone rubber may be required. Elasto Proxy can help you with compound selection.
Advantages of Custom-Fabricated Locking Gaskets
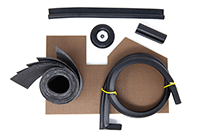
When you source locking gaskets from Elasto Proxy, you can buy lengths of rubber that you cut yourself, or you can order custom-fabricated gaskets that are ready-to-install right out of the box. Cutting your own locking gaskets might seem cost-effective, but using a hand tool like a wire cutter can result in poor-quality cuts and material waste. If you decide to make your own cuts, marking the length on your workbench or other cutting surface can help speed the process, especially with higher volumes.
For fast, cost-effective, and high-quality cuts, choose custom-fabricated gaskets instead. The cut-to-length gaskets that Elasto Proxy provides harness the power of our water jet cutting machine, which makes fine, fast cuts without tooling or waiting for tooling. Elasto Proxy can ship your custom-fabricated products on-demand, or in accordance with your sales forecasts. No matter who does the cutting, however, you’ll need to follow some installation tips and best practices.
Locking Gasket Installation Advice
As you learned earlier in this article, the rubber that’s used in locking gaskets will experience shrinkage. To prevent the edges of the gasket from separating, you need extrusions with a bit of extra length. When you press the locking gasket onto the body panel, push the gasket ends together so that there’s more material in the loop that forms. Pressing this loop downward forces material into the application and prevents stretching.
Before installing the glass, lubricate the locking gasket with a mixture of soap and water or a silicone-based spray. Apply the lubricant generously but avoid fluids that could damage the gasket or the panel. To prevent the lubricant from wetting other surfaces, hold the spray bottle or can in one hand and a piece of cardboard in other. Position the cardboard on the other side of the window or windshield area that you plan to spray.
To install the glass, start with the body side first. In other words, don’t start inside of the cabin or enclosure. Rest the bottom of the glass in the locking gasket so that you don’t have to struggle with the weight of the window or windshield. Using a knife-like tool with a plastic blade can help to prevent glass breakage as you work the gasket’s lip over and around the glass. When lip is fully over the glass, the window or windshield will pop into place.
Next, lock the gasket into itself. Some installers use a screwdriver, but the blade can slip and scratch the paint on the body panel. Tools with a screwdriver-like handle and hooked end are a better choice. These gasket locking tools can feature a pointed tip or metal ball at the end. Some installers prefer the latter type because the ball tends to stay in place and won’t rip the gasket. Plus, if the tool comes loose, the metal ball is less likely to scratch the paint on the body panel.
Finally, slide the tool around the gasket’s edges to lock the seal into place. If there’s residual lubricant on the window or windshield, wipe the surface clean with a rag. No matter which type of locking gasket you choose, it’s important to follow the proper installation steps. Elasto Proxy keeps over 700 standard profiles in stock and can supply lengths in bulk or custom-fabricated products. To learn more, contact us.